The AB Electronics UK Knowledge Base provides support solutions, tutorials and troubleshooting guides.

YOU WILL NEED THIS BOARD
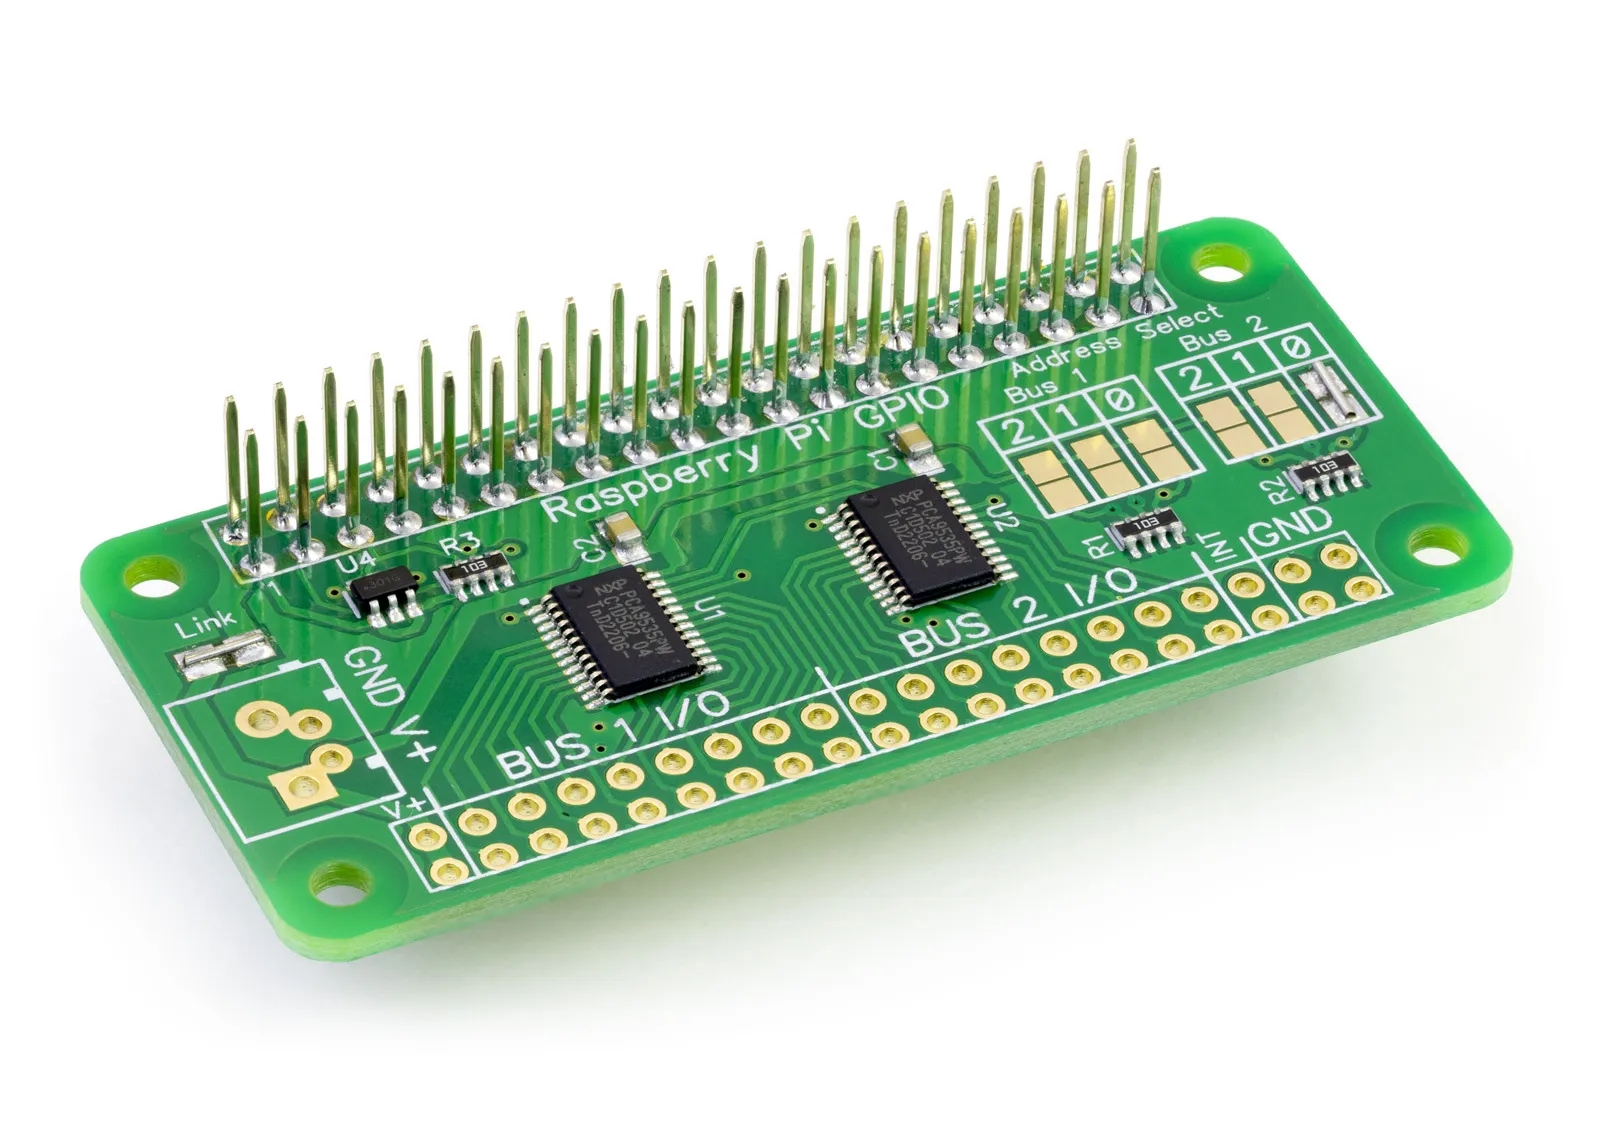
IO Zero 32
32 channel digital I/O development board for the Raspberry Pi and Single-Board Computers
£10.99 ex VAT
You can use the IO Zero 32 development board with the Raspberry Pi Pico development boards. We have a MicroPython library to use with the Raspberry Pi Pico at GitHub at our MicroPython Libraries GitHub Repository
The example Python files can be found in /ABElectronics_MicroPython_Libraries/IOZero32/demos/
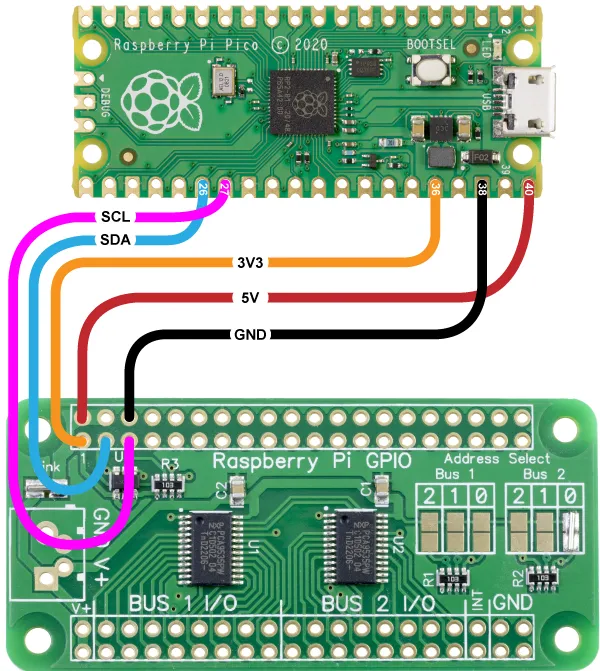
Connecting the IO Zero 32 to the Raspberry Pi Pico
The IO Zero 32 library uses the following pins on the Raspberry Pi Pico board.
| Pico Pin | Pico GPIO | Function | Pi Pin | Pi GPIO |
|---|---|---|---|---|
| 26 | 20 | I2C SDA | 3 | GPIO 2 |
| 27 | 21 | I2C SCL | 5 | GPIO 3 |
| 40 | VBUS | 5V | 2 | 5V Power |
| 38 | GND | GND | 6 | Ground |
| 36 | 3V3(OUT) | 3V3 | 1 | 3v3 Power |
Wiring Diagram:
Downloading and Installing the library
To download to your Raspberry Pi, type in the terminal:
git clone https://github.com/abelectronicsuk/ABElectronics_MicroPython_Libraries.git
To install the MicroPython Library, use the Thonny Python IDE.
Create a file for your chosen board and copy the contents of the Python file into that board's directory. For example, for the IO Zero 32, create a new file in thonny called IOZero32.py and copy contents from IOZero32.py into the new file and save it onto the Raspberry Pi Pico board.
Create a second file where your main program will reside and import the board library at the program's top with "Run Current Command" or F5 in Thonny.
Classes:
IOZero32(address, sda, scl)
Parameters:
address: i2c address for the target device. 0x20 to 0x27
sda (optional): I2C SDA pin. If no value is set, the class will default to pin 20.
scl (optional): I2C SCL pin. If no value is set, the class will default to pin 21.
Functions:
set_pin_direction(pin, value):
Sets the IO direction for an individual pin
Parameters:
pin: 1 to 16
value: 1 = input, 0 = output
Returns: null
get_pin_direction(pin)
Get the IO direction for an individual pin
Parameters:
pin: pin to read, 1 to 16
Returns: 1 = input, 0 = output
set_port_direction(port, value):
Sets the IO direction for the specified IO port
Parameters:
port: 0 = pins 1 to 8, 1 = pins 9 to 16
value: number between 0 and 255 or 0x00 and 0xFF. Each bit in the 8-bit number represents a pin on the port. 1 = input, 0 = output
Returns: null
get_port_direction(port):
Get the direction from an IO port
Parameters:
port: 0 = pins 1 to 8, 1 = pins 9 to 16
Returns: number between 0 and 255 (0xFF)
set_bus_direction(value):
Sets the IO direction for all pins on the bus
Parameters:
value: 16-bit number 0 to 65535 (0xFFFF). For each bit 1 = input, 0 = output
Returns: null
get_bus_direction()
Get the direction for an IO bus.
Returns: 16-bit number 0 to 65535 (0xFFFF). For each bit 1 = input, 0 = output
write_pin(pin, value)
Write to an individual pin 1 - 16
Parameters:
pin: 1 to 16
value: 1 = logic high, 0 = logic low
Returns: null
write_port(port, value)
Write to all pins on the selected port
Parameters:
port: 0 = pins 1 to 8, 1 = pins 9 to 16
value: number between 0 and 255 or 0x00 and 0xFF. Each bit in the 8-bit number represents a pin on the port. 1 = logic high, 0 = logic low
Returns: null
write_bus(value)
Write to all pins on the selected bus
Parameters:
value: 16-bit number 0 to 65535 (0xFFFF). For each bit 1 = logic high, 0 = logic low
Returns: null
read_pin(pin)
Read the value of an individual pin 1 - 16
Parameters:
pin: 1 to 16
Returns: 0 = logic low, 1 = logic high
read_port(port)
Read all pins on the selected port
Parameters:
port: 0 = pins 1 to 8, 1 = pins 9 to 16
Returns: number between 0 and 255 or 0x00 and 0xFF. Each bit in the 8-bit number represents a pin on the port. 0 = logic low, 1 = logic high
read_bus()
Read all pins on the bus.
Returns: 16-bit number 0 to 65535 (0xFFFF). Each bit in the 16-bit number represents a pin on the port. 0 = logic low, 1 = logic high
set_pin_polarity(pin, value)
Set the polarity of the selected pin
Parameters:
pin: 1 to 16
value: 0 = same logic state of the input pin, 1 = inverted logic state of the input pin
Returns: null
get_pin_polarity(pin)
Get the polarity of the selected pin
Parameters:
pin: pin to read, 1 to 16
Returns: 0 = same logic state of the input pin, 1 = inverted logic state of the input pin
set_port_polarity(port, value)
Set the polarity of the pins on a selected port
Parameters:
port: 0 = pins 1 to 8, 1 = pins 9 to 16
value: number between 0 and 255 or 0x00 and 0xFF. Each bit in the 8-bit number represents a pin on the port. 0 = same logic state of the input pin, 1 = inverted logic state of the input pin
Returns: null
get_port_polarity(port):
Get the polarity for the selected IO port
Parameters:
port: 0 = pins 1 to 8, 1 = pins 9 to 16
Returns: number between 0 and 255 (0xFF)
set_bus_polarity(value)
Set the polarity of the pins on the bus
Parameters:
value: 16-bit number 0 to 65535 (0xFFFF). For each bit, 0 = same logic state of the input pin, 1 = inverted logic state of the input pin
Returns: null
get_bus_polarity()
Get the polarity of the pins on the bus.
Returns: 16-bit number 0 to 65535 (0xFFFF). For each bit, 0 = same logic state of the input pin, 1 = inverted logic state of the input pin
Usage
To use the IO Zero 32 library in your code, you must first import the library:
from IOZero32 import IOZero32
Next, you must initialise the IOZero32 object with the I2C address of the I/O controller chip. The default addresses for the IO Zero 32 are 0x20 and 0x21:
bus1 = IOZero32(0x20)
We will read the inputs 1 to 8 from bus 1, so set port 0 as inputs.
bus1.set_port_direction(0, 0xFF)
You can now read pin 1 with the following:
print('Pin 1: ' + str(bus1.read_pin(1)))
Also useful for your Raspberry Pi project
Temperature & Sensing
1 Wire Pi Plus
Connect dozens of 1-Wire sensors - temperature, iButtons, EEPROMs - via a single GPIO pin. Stacks directly on the 40-pin header.
Analogue I/O
ADC Pi
Read up to 8 analogue inputs - perfect for pairing with your temperature sensors or other analogue-output devices.
All-in-one
Expander Pi
Combines ADC, DAC, 32 GPIO ports and a real-time clock on one board. The most versatile board for complex Raspberry Pi projects.
Chapters
Related Articles
Order these Boards
IO Zero 32
32 channel digital I/O development board for the Raspberry Pi and Single-Board Computers
£10.99 ex VAT