The AB Electronics UK Knowledge Base provides support solutions, tutorials and troubleshooting guides.

YOU WILL NEED THIS BOARD
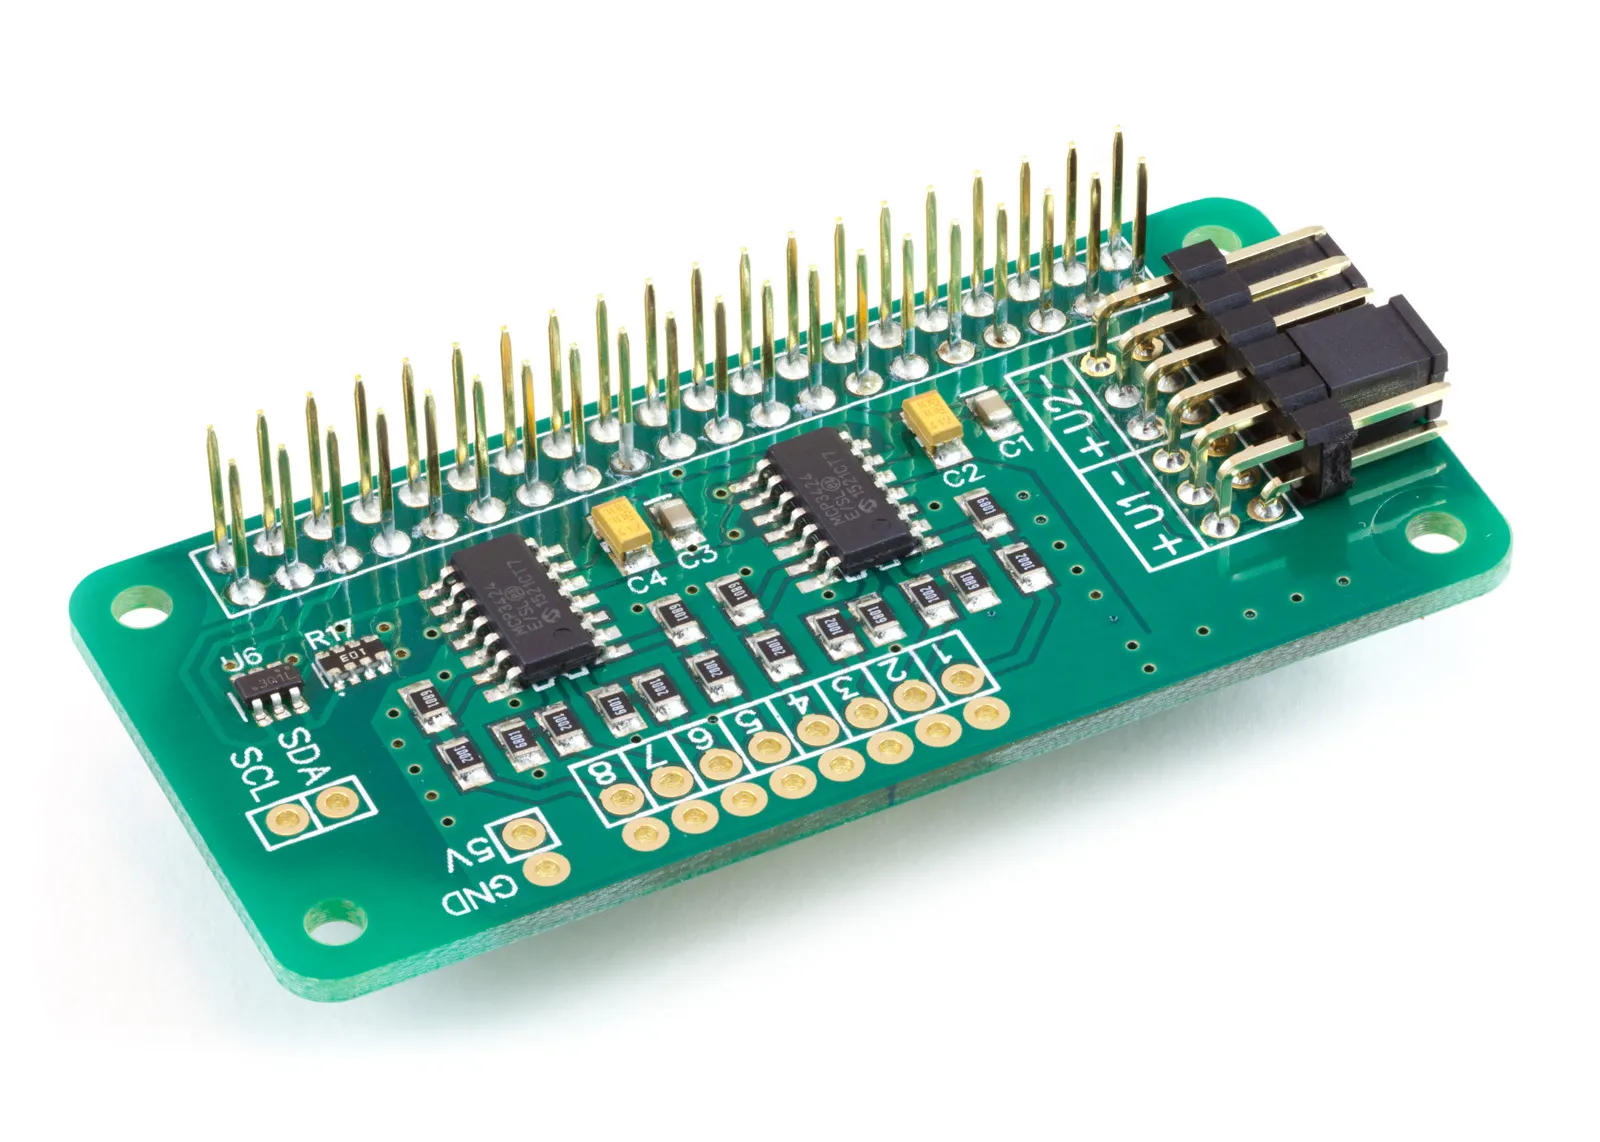
ADC Pi
8 Channel 17-bit Single-Ended Analogue to Digital Converter for the Raspberry Pi and Single-Board Computers
£17.99 ex VAT
Keeping your plants healthy starts with good watering habits, and that means knowing exactly when your soil is too dry. In this tutorial, we’ll show you how to build a simple yet effective soil moisture monitoring system using a capacitive moisture sensor, an ADC Pi, and a Raspberry Pi.
The moisture level in soil can be measured based on the volumetric water content (VWC).
What is Volumetric Water Content (VWC)?
Volumetric Water Content (VWC) is a measure of how much water is present in the soil, expressed as a percentage of the total volume of soil. For example, a VWC of 30% means that in a given volume of soil, 30% of it is water and the remaining 70% is a mix of soil particles and air.

This is the most commonly used measurement for soil moisture because it directly tells us how much water is available to plant roots.
Why VWC Matters for Growing Plants
Plants absorb water through their roots, but they also need oxygen. Soil that is too dry doesn’t provide enough water for the plant, and soil that is too wet can drown roots by blocking air from reaching them.
The Sweet Spot
- Too dry (low VWC): Plant roots can’t take up enough water, causing stress, wilting, or even death.
- Too wet (high VWC): The soil becomes waterlogged, leading to root rot, fungal diseases, and lack of oxygen.
- Ideal VWC: Most garden plants thrive when the soil VWC is between 20% and 45%, depending on soil type and plant species.
How VWC is Measured
VWC can be estimated using capacitive soil moisture sensors, which measure how much water affects the electrical properties of the soil. These sensors don’t directly measure water volume, but they can be calibrated to estimate VWC based on changes in sensor voltage.
Why Use a Capacitive Soil Moisture Sensor?
Capacitive sensors measure soil moisture by detecting changes in capacitance caused by varying moisture levels. Measuring the soil using capacitance means the wires do not need to be exposed to the elements which protects them from corroding that happens with resistive types of moisture sensors that measure moisture by passing a current through the soil. This makes them more reliable over time, especially for long-term monitoring projects.
What You’ll Need
To get started measuring moisture content, you will need the following:
- Raspberry Pi (any model with GPIO headers, preferably with internet access for remote monitoring)
- Raspberry Pi power supply
- Capacitive soil moisture sensor (typically outputs an analogue voltage) such as amazon.co.uk/DollaTek-Capacitive-Corrosion-Resistant-Detection/dp/B07L2RV1D2
- ADC Pi (Analogue-to-Digital Converter – since the Pi lacks analogue inputs) ADC Pi
- Jumper wires
- Breadboard or terminal blocks (optional, for easier wiring)
- Python (for reading data and visualising moisture levels)
Setting Up the Hardware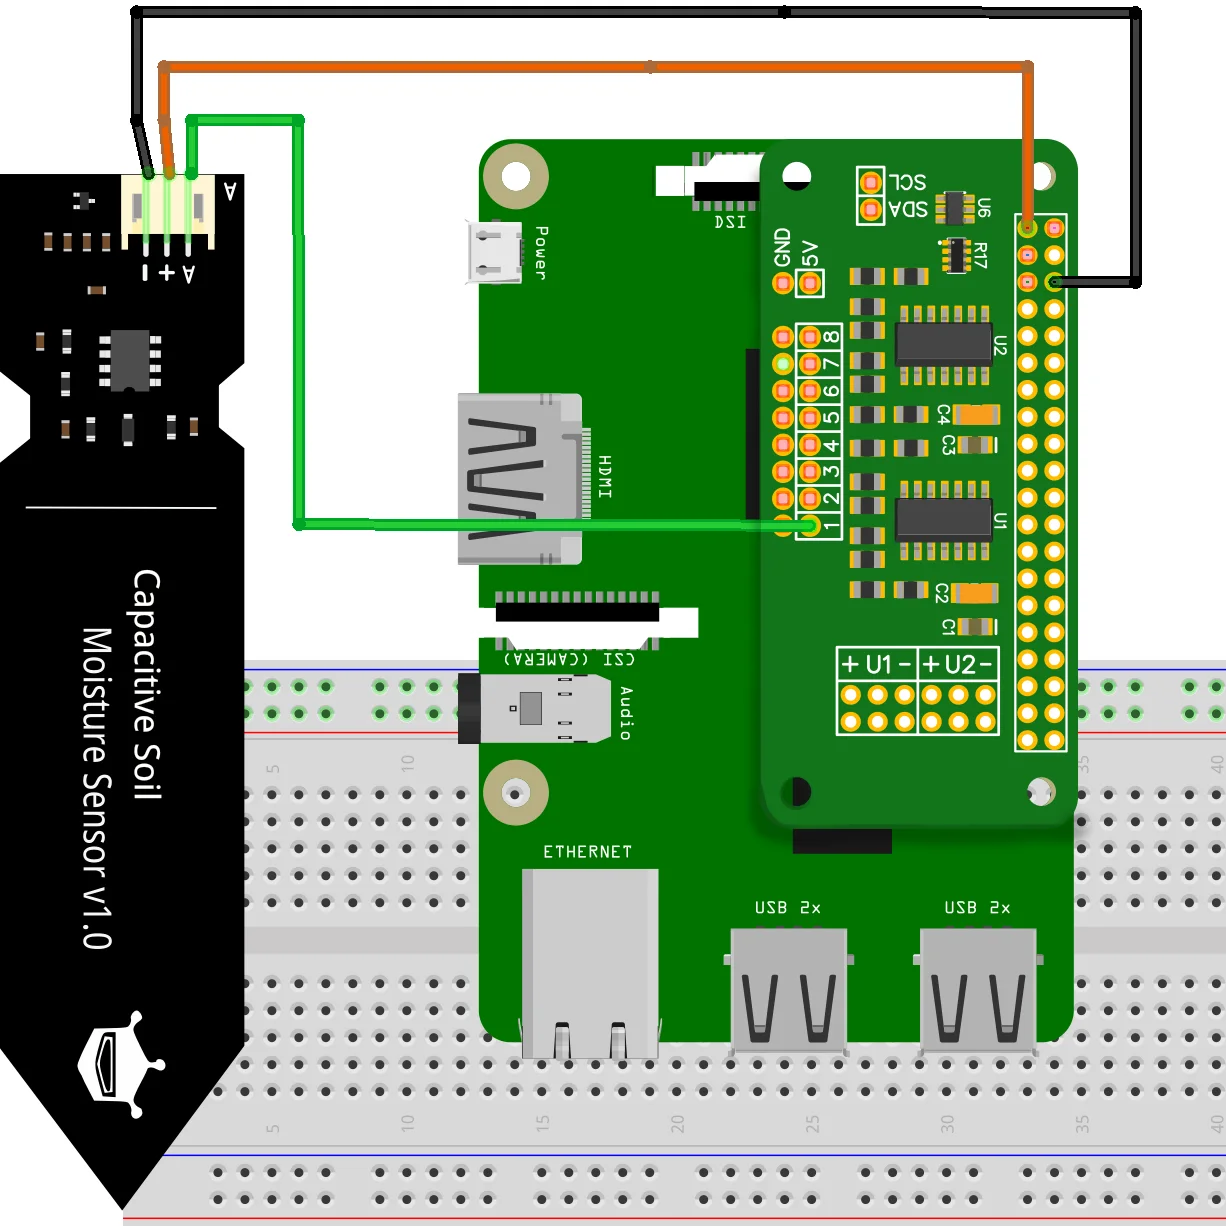
- Connect the ADC Pi to the Raspberry Pi
The ADC Pi fits neatly onto the GPIO header of your Raspberry Pi. Ensure it’s properly seated. The ADC Pi uses the I2C interface to communicate with the Raspberry Pi. - Wire the Capacitive Sensor to the ADC Pi
- VCC to 3.3V on the Pi (check your sensor’s voltage rating)
- GND to GND
- AOUT (analogue output) to one of the ADC Pi channels (e.g., CH1)
(Note: If you are planning on using several capacitive moisture sensors we recommend that you use an external 3.3V power supply to reduce the chance of overloading the 3.3V power regulator on the Raspberry Pi.)
- Power on the Raspberry Pi
Once connected, boot up your Pi and make sure I2C is enabled. We have a tutorial for I2C setup at How to Enable I2C on the Raspberry Pi
Before we can begin measuring the amount of water in the soil we will need to calibrate the soil moisture sensor.
How to Calibrate a Soil Moisture Sensor for VWC
Capacitive soil moisture sensors don’t directly measure the amount of water in the soil, they detect changes in soil permittivity, which varies with moisture. To use their readings as VWC percentages, you need to calibrate the sensor by reading the voltage output using known water content levels.
What You’ll Need
- A Soil moisture sensor
- A container with your target soil (e.g. garden mix, compost, sandy soil)
- A digital scale (for accurate water and soil weights)
- Measuring cup or syringe
- ADC Pi to read voltage values
- Patience!
Measuring the voltage in Python
We can use the ADC Pi and Python to take the voltage measurements needed to calibrate the soil moisture sensor. Install the ADC Pi Python library from the instructions on Getting Started with the ADC Pi
Create a new Python file called soilsensor.py and enter the following code:
from ADCPi import ADCPi
import os


adc = ADCPi(0x68, 0x69, 18)
While True:
    os.system('clear' if os.name == 'posix' else 'cls')
    print("Channel 1: %02f" % adc.read_voltage(1))
The code begins by importing the ADCPi library and the os library.
from ADCPi import ADCPi
import os
The ADCPi library contains the ADCPi class and all of the functions needed to control the ADC Pi. The os library is used to clear the display when updating the voltage reading.
Next we create an ADCPi object from the ADCPi class called adc. The ADCPi class takes three parameters, the two I2C addresses for the ADC Pi and the bit mode which sets the resolution of the ADC readings. We will assume the ADC Pi is on its default I2C addresses of 0x68 and 0x69 and we will set the bit mode to 18 bits to give us the most accurate readings.
adc = ADCPi(0x68, 0x69, 18)
The program needs to continuously read voltages and update the display so we will use a While loop to keep the program running until the user exits by pressing Ctrl-C on the keyboard.
While True:
To make the voltage easier to read we will clear the display before printing the value so the voltage always appears at the top of the screen.
os.system('clear' if os.name == 'posix' else 'cls')
Finally we can read the voltage from channel 1 on the ADC and print it to screen.
print("Channel 1: %02f" % adc.read_voltage(1))
Save the program as soilsensor.py and run it using the command:
python soilsensor.py
If everything works correctly the voltage from channel 1 should begin updating on the display. Now we can read the voltage from the soil moisture sensor and we can calibrate it.
Step-by-Step Calibration
Step 1: Dry Soil Reference
- Dry your soil completely (leave it in the sun or an oven at low heat).
- Weigh a fixed volume of this dry soil (e.g. 100 mL).
- Insert the sensor and record the voltage — this is your 0% VWC reference.
Step 2: Add Known Amounts of Water
- Add a known amount of water to the dry soil (e.g. 20 mL to 100 mL of dry soil gives 20% VWC).
- Mix thoroughly and let it rest for uniform distribution.
- Insert the sensor and record the voltage.
- Repeat for multiple water contents (e.g. 10%, 20%, 30%, 40%, up to saturation).
Step 3: Create a Calibration Curve
- Plot sensor voltage vs VWC on a graph.
- Fit a curve or linear equation to the data points.
- Use this formula in your code to convert voltage to estimated VWC.
Example formula (if linear):
VWC = (V_DRY - adc_value) / (V_DRY - V_WET) * 100
Where:
- adc_value is the moisture sensor reading
- V_DRY is the voltage in dry soil
- V_WET is the voltage at the saturation point
Tips
- Use your actual soil for best accuracy.
- Record readings after mixing and waiting, not immediately.
- More data points = more accurate calibration.
- Avoid calibrating in pure water — it’s unrealistic for soil conditions.
Calculating the VWC with Python
Let us assume that you have collected data points for your moisture sensor and the result is the linear equation VWC = ((V_DRY - adc_value) / (V_DRY - V_WET)) * 100. We can add this equation into the soilsensor.py program so that it can output the VWC value from the moisture sensor.
The first step is to add the V_DRY and V_WET reference voltage into the program. We could add the numbers directly into the equation but a better option is to use variables as these are easier to update in the future if you recalibrate your sensor to a different soil type.
Add the following two variables into the program below "import os"
V_DRY = 0.80   # Sensor voltage in dry soil
V_WET = 0.45   # Sensor voltage in wet soil
Change the values for V_DRY and V_WET to those that you measured with your sensor.
Next we will create a function to convert the voltage from the ADC into the VWC value as a percentage between 0 and 100%. Using a separate function allows us to make the calculation on multiple sensors without having to repeat the same code several times.
Below the V_WET variable add the following code.
def moisture_percent(adc_value: float) -> int:
   moisture = 100 * (V_DRY - adc_value) / (V_DRY - V_WET)
   if moisture < 0:
      return 0
   elif moisture > 100:
       return 100
   else:
       return int(moisture)
We will go through the function line by line to see how it works.
The first line def moisture_percent(adc_value: float) -> int: defines a function called moisture_percent and takes a parameter called adc_value with a data type of float. The -> int tells Python that the value returned from the function is an integer or whole number.
Next we create a variable called moisture and use the equation that we created above to calculate the VWC value and store it in the moisture variable.
If, when you calibrate your sensor you find that the voltages are not linear across the moisture range you can replace this code with an equation that better represents the values from your sensor.
In an ideal world the moisture sensor would only output voltages within the range of the soil moisture levels. In reality it will also output voltages outside of that range. If the sensor becomes disconnected or fails for some reason the voltage may drop to 0V. If the sensor is working but left out of the soil in the air it can output a voltage up to 2.5V.
These voltages would make the moisture percentage fall outside of 0 to 100% so to prevent this we will reject any value that falls outside of this range. We can do this with an if statement that returns 0 for values below 0 and 100 for values above 100. Values within the expected range are returned at the end of the moisture_percent function.
Now we have a function to calculate the moisture percentage value, we can add it into our original program and change the print line to call the moisture_percent function while passing in the voltage from the ADC and format it as an integer.
print("Channel 1: %d%%" % moisture_percent(adc.read_voltage(1)))
The final program should look like this.
from ADCPi import ADCPi
import os
def moisture_percent(adc_value: float) -> int:
   moisture = 100 * (V_DRY - adc_value) / (V_DRY - V_WET)
   if moisture < 0:
      return 0
   elif moisture > 100:
       return 100
   else:
       return int(moisture)


adc = ADCPi(0x68, 0x69, 18)
While True:
    os.system('clear' if os.name == 'posix' else 'cls')
    print("Channel 1: %d%%" % moisture_percent(adc.read_voltage(1)))
Save your program and run it using using python soilsensor.py
If everything works as planned it will read from the connected soil sensor and display the soil moisture as a percentage between 0 and 100%.
Browse our Knowledge Base for more ADC Pi tutorials and other Raspberry Pi development boards from AB Electronics UK.
Also useful for your Raspberry Pi project
Temperature & Sensing
1 Wire Pi Plus
Connect dozens of 1-Wire sensors - temperature, iButtons, EEPROMs - via a single GPIO pin. Stacks directly on the 40-pin header.
Analogue I/O
ADC Pi
Read up to 8 analogue inputs - perfect for pairing with your temperature sensors or other analogue-output devices.
All-in-one
Expander Pi
Combines ADC, DAC, 32 GPIO ports and a real-time clock on one board. The most versatile board for complex Raspberry Pi projects.