Knowledge Base
The AB Electronics UK Knowledge Base provides support solutions, tutorials and troubleshooting guides.

-
Raspberry Pi Tutorials
- PCB Header Assembly Jig
- Raspberry Pi GPIO Pins
- Samba Setup on Raspberry Pi
- Set a static IP Address on Raspberry Pi OS Trixie
- Set a static IP Address on Raspberry Pi OS Buster
- Set a static IP Address on Raspberry Pi OS Wheezy
- I2C Part 1 - Introducing I2C
- I2C Part 2 - How to Enable I2C on the Raspberry Pi
- I2C Part 3 - I2C tools in Linux
- I2C Part 4 - Programming I2C with Python
- SPI and Python on Raspberry Pi OS
- Using Pythonpath with our Python Libraries
- Connecting Development Boards to the Raspberry Pi 400
- General
- Code & Languages
- Raspberry Pi Pico Tutorials
- 1 Wire Pi Tutorials
- ADC Pi Tutorials
- ADC DAC Pi Zero Tutorials
- ADC Differential Pi Tutorials
- Expander Pi Tutorials
-
IO Pi Plus Tutorials
- IO Pi Plus FAQ
- IO Pi Plus Tutorial 1 - The Blinking LED
- IO Pi Plus Tutorial 2 - Push the Button
- IO Pi Plus Tutorial 3 - Introducing Interrupts
- IO Pi Plus Tutorial 4 - More Interrupts
- IO Pi Plus Tutorial - MQTT Reading the Ports
- IO Pi Plus with Raspberry Pi Pico
- IO Pi Plus Tutorial - MQTT Control
- Driving Relays or Higher Loads with the IO Pi Plus
- 16 Channel Opto-Isolated Input Board
- Relay Board for the IO Pi Plus 2.1
- IO Zero 32 Tutorials
- RTC Pi Tutorials
- Serial Pi
- Servo PWM Pi Tutorials
-
Home Assistant
- Using 1 Wire with Home Assistant and the Raspberry Pi OS
- Using I2C Devices on the Raspberry Pi with Home Assistant
- Using the ADC Differential Pi with Home Assistant on the Raspberry Pi
- Using the ADC Pi with Home Assistant on the Raspberry Pi
- Using the IO Pi Plus with Home Assistant on the Raspberry Pi
-
Legacy Products
- ADC DAC Pi (Discontinued)
- ADC Pi (Discontinued)
- Buffer Pi - Legacy Product
- Com Pi (Discontinued)
- Delta-Sigma Pi (Discontinued)
- Expander Pi (Discontinued)
- IO Pi (Discontinued)
- IO Pi Plus 1.0 (Discontinued)
- IO Pi Zero (Discontinued)
- Logic Level Converter (Discontinued)
- RTC Alarm Pi (Discontinued)
- RTC Pi (Discontinued)
- Serial Pi (Discontinued)
- 1 Wire Pi (Discontinued)
- 1 Wire Pi Plus 1.0 (Discontinued)
- Other Supported Platforms
IO Pi Plus Tutorials
Articles and Tutorials for the IO Pi Plus
Created 27/07/2024 | Last Updated: 31/10/2025
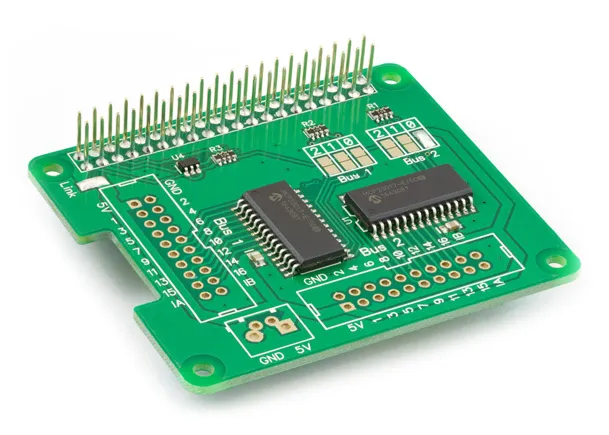
The IO Pi Plus is a 32-channel GPIO development board for the Raspberry Pi and other compatible single-board computers. The board is based around two MCP23017 16-bit I/O expanders from Microchip Technology Inc, allowing you to connect up to 32 digital channels to the Raspberry Pi.
This knowledge base section contains articles and tutorials on the IO Pi Plus, showing how to use the development board with various input devices.
Find out more about the IO Pi Plus.
